
Hello! I’m HAYAO, a programmer at HazeDenki Inc.
If you’d like, please follow me on Twitter(X) as well.
I’m continuing this series based on the outline I shared earlier.
You can jump to the previous entries:
- Building the foundation for a visual novel: where to start?
- Choosing a Visual Novel engine — Utage vs Naninovel
- Setting up the development environment
- Customizing the VN engine with AI
- Naninovel feature deep dive: creating custom commands
Last time, I walked through how to add a custom command.
However, the example from the previous article was purely experimental and not really practical, so this time I’ll introduce code that is actually usable in a real project.
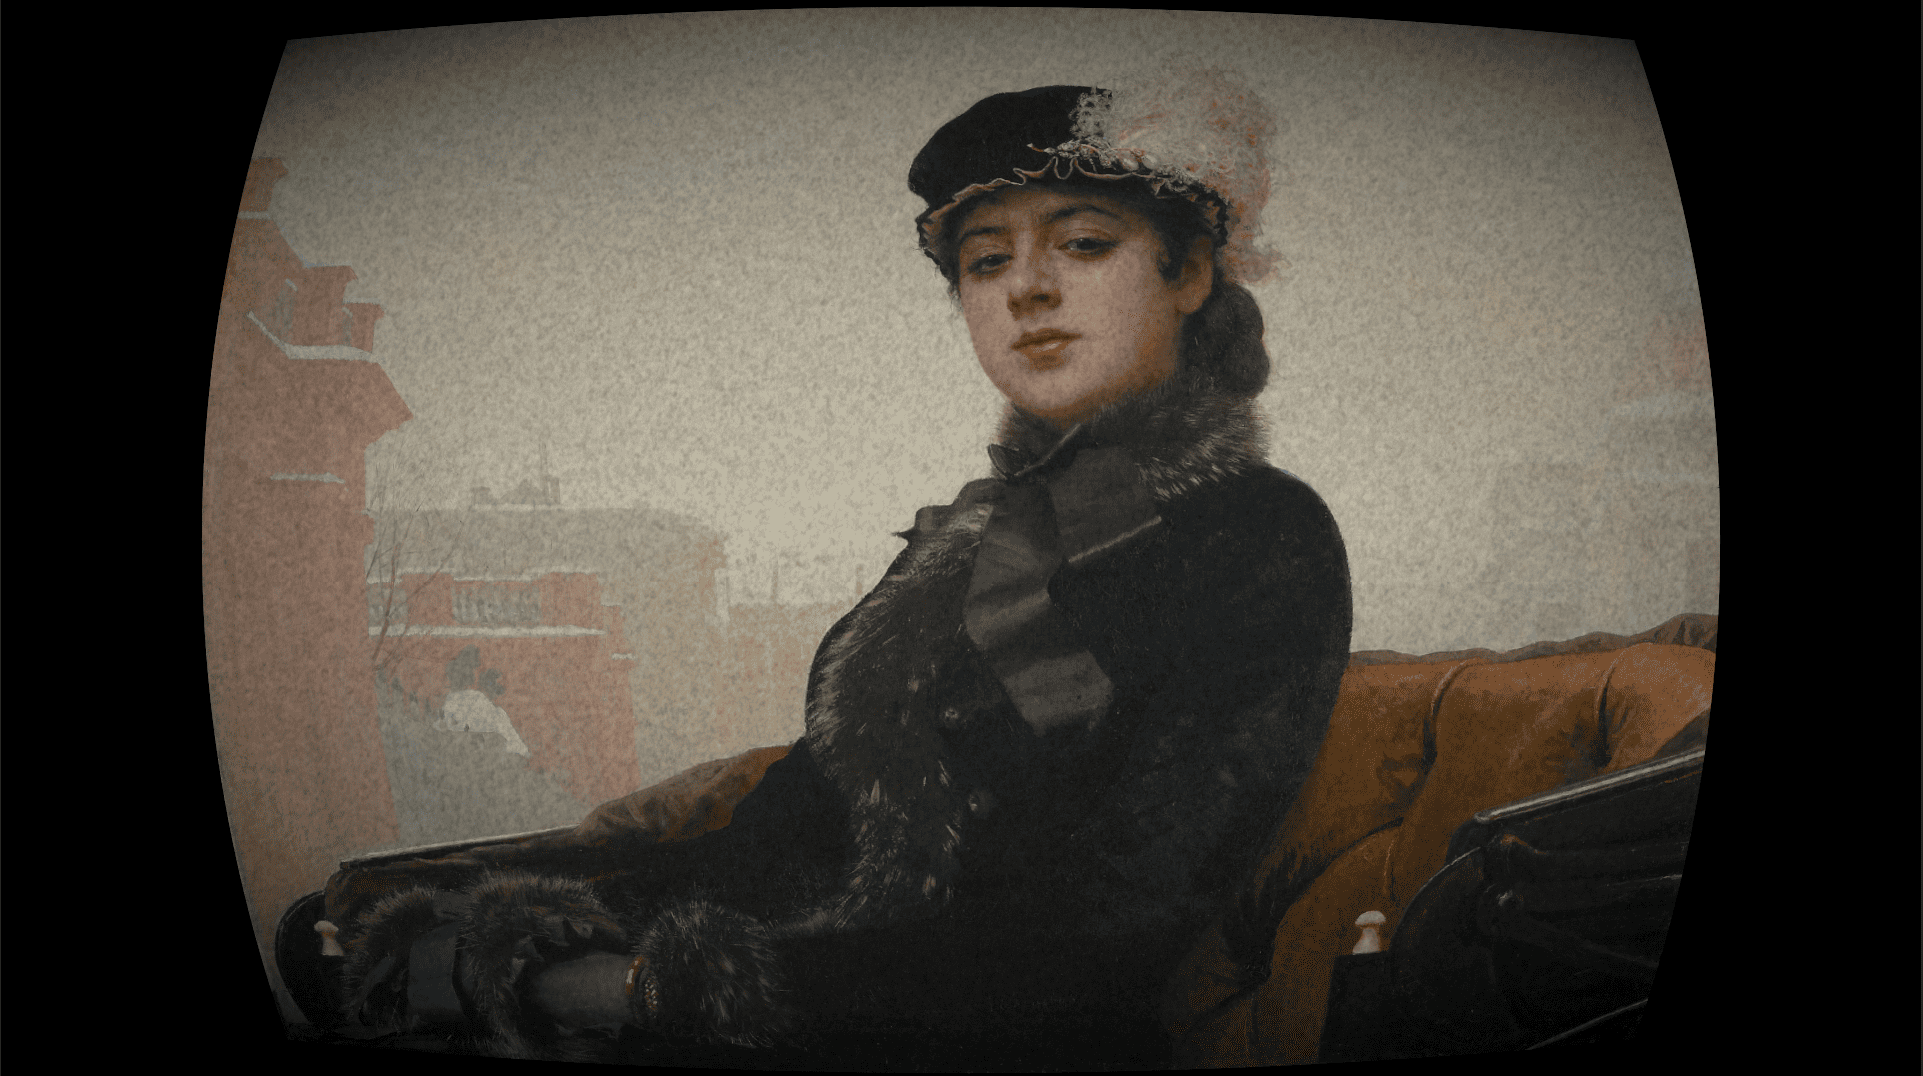
Here’s the effect this custom command will apply once you’ve finished implementing everything in this article:
Before applying
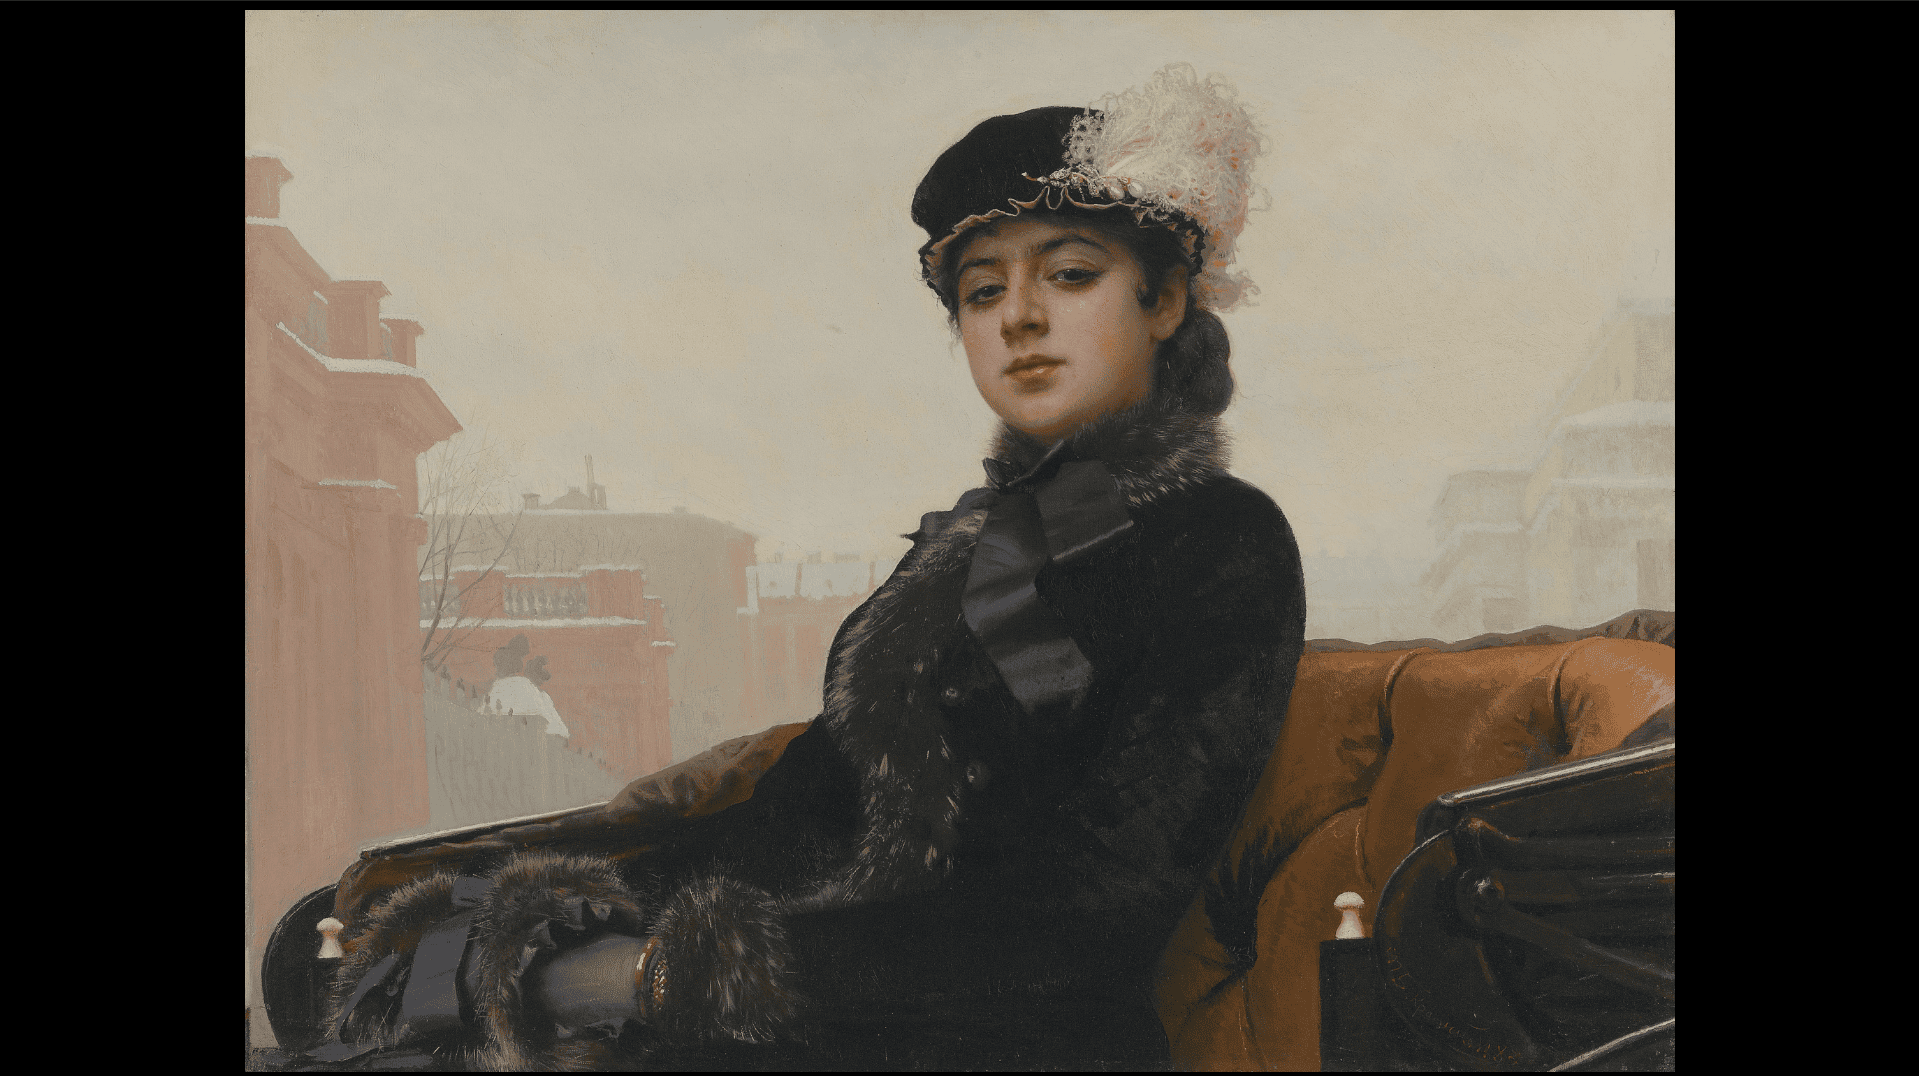
After applying

It’s a custom command that applies lens distortion + noise + vignette to the screen.
1.Preparation
This article assumes you’ve already cleared the following conditions:
- You’re using a URP project where post-processing can be applied.
- The DefaultVolumeProfile is assigned to the Universal Render Pipeline’s Volume.
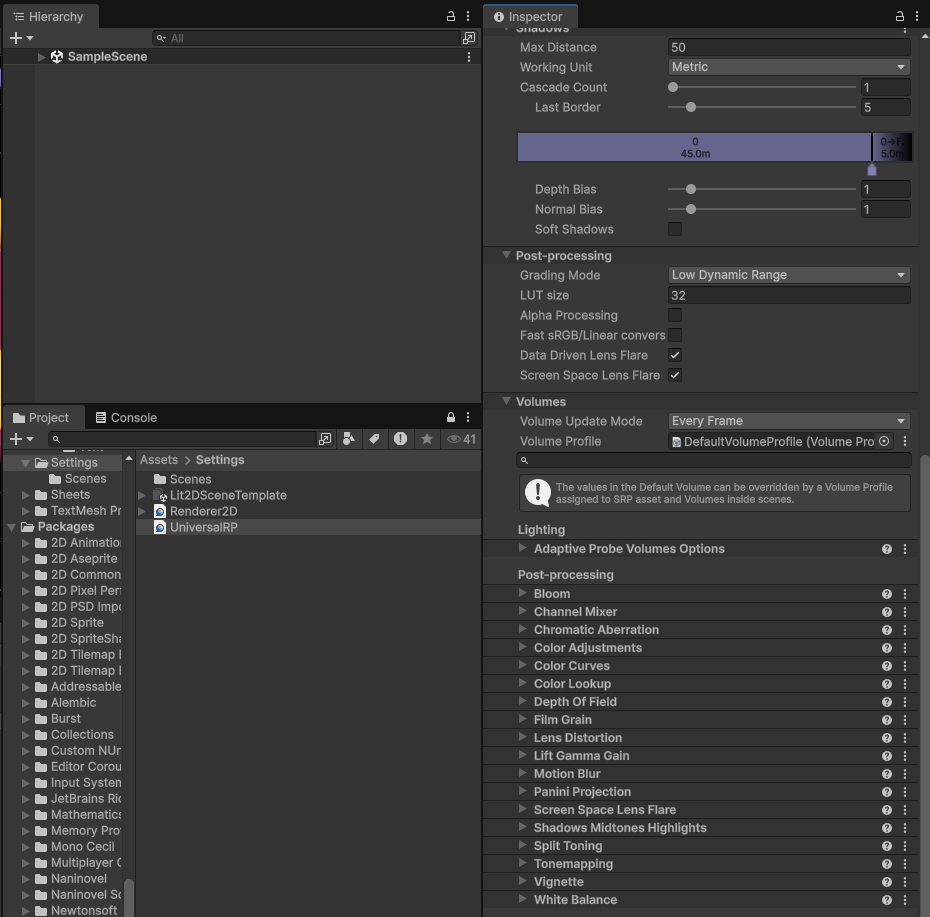
Example settings for DefaultVolumeProfile:

Example settings for Universal Render Pipeline:
2.Spec design
First, let’s decide what kind of custom command we want to use to apply this effect.
In this article, we’ll aim for something you can call in a scenario like this:
We’ll name the effect FilmLook.
/// Apply the effect
@filmLook

/// Stop the effect
@filmLook stop:true
Next, let’s explore what level of screen effect feels best.
Enter Play mode in the Game view and tweak the DefaultVolumeProfile we mentioned earlier while you test.
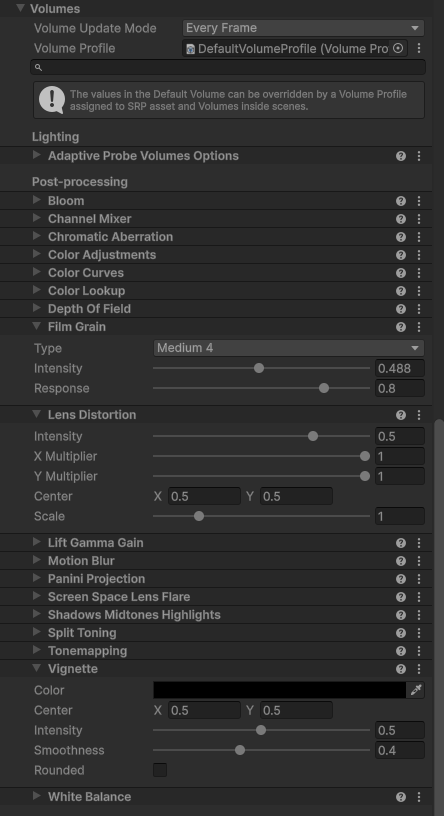
For this article, we’ll use the following settings as the target:
Focus on FilmGrain, LensDistortion, and Vignette.
Since we’re making a visual novel, the screen effect also needs to switch correctly when the player saves, loads, or goes back to the title.
Keep in mind that we’ll need to coordinate with the system side, not just execute commands in script.
Based on the above, we’ll implement the following two files:
- FilmLook.cs: custom command executor class. Changes VolumeProfile values according to the command.
- FilmLookController.cs: controller class that links the FilmLook effect with Naninovel’s system features such as save/load.
3. Implementation
So, I’ve implemented the two files.
I think it’s faster to show the code first and then explain, so here’s the full source.
Also, the part that integrates with Naninovel’s save/load system is almost entirely based on AI-assisted investigation and is fairly complex, so it’s easiest to understand by actually running it and observing the behavior.
◆ Explanation of FilmLook.cs
Code
using Naninovel;
using Naninovel.Commands;
using System;
using UnityEngine;
using UnityEngine.Rendering;
using UnityEngine.Rendering.Universal;


namespace CustomCommands
{
    /// <summary>
    /// Apply a film-look effect.
    /// Usage:
    /// @filmLook
    /// @filmLook stop:true
    /// </summary>
    [CommandAlias("filmLook")]
    public class FilmLook : Command
    {
        /// <summary>
        /// Stop the effect.
        /// </summary>
        [ParameterAlias("stop")]
        public BooleanParameter StopEffect;

        private Vignette vignette;
        private FilmGrain filmGrain;
        private LensDistortion lensDistortion;


        public override async Naninovel.UniTask Execute(AsyncToken asyncToken = default)
        {
            // Get each component from the VolumeStack
            var volumeStack = VolumeManager.instance.stack;
            vignette = volumeStack.GetComponent<Vignette>();
            filmGrain = volumeStack.GetComponent<FilmGrain>();
            lensDistortion = volumeStack.GetComponent<LensDistortion>();


            // Error check
            if (vignette == null || filmGrain == null || lensDistortion == null)
            {
                Debug.LogError("[FilmLook] Volume components not found in Volume Stack!");
                return;
            }


            // Stop
            if (StopEffect)
            {
                ResetEffect();
                SaveState();
                return;
            }

            ApplyEffect();
            SaveState();

            await Naninovel.UniTask.CompletedTask;
        }


        private void ApplyEffect()
        {
            // Vignette settings
            vignette.active = true;
            vignette.intensity.value = 0.5f;
            vignette.smoothness.value = 0.4f;
            vignette.rounded.value = false;


            // Film Grain settings
            filmGrain.active = true;
            filmGrain.type.value = FilmGrainLookup.Medium4; // Medium4 type
            filmGrain.intensity.value = 0.5f;
            filmGrain.response.value = 0.8f;


            // Lens Distortion settings
            lensDistortion.active = true;
            lensDistortion.intensity.value = 0.5f;
            lensDistortion.xMultiplier.value = 1.0f;
            lensDistortion.yMultiplier.value = 1.0f;
            lensDistortion.center.value = new Vector2(0.5f, 0.5f);
            lensDistortion.scale.value = 1.0f;


            Debug.Log("[FilmLook] applied successfully");
        }


        private void ResetEffect()
        {
            // Reset Vignette
            vignette.intensity.value = 0f;
            vignette.smoothness.value = 0.2f;
            vignette.rounded.value = false;
            vignette.center.value = new Vector2(0.5f, 0.5f);
            vignette.active = false;


            // Reset Film Grain
            filmGrain.intensity.value = 0f;
            filmGrain.type.value = FilmGrainLookup.Thin1;
            filmGrain.response.value = 0.8f;
            filmGrain.active = false;


            // Reset Lens Distortion
            lensDistortion.intensity.value = 0f;
            lensDistortion.xMultiplier.value = 1f;
            lensDistortion.yMultiplier.value = 1f;
            lensDistortion.center.value = new Vector2(0.5f, 0.5f);
            lensDistortion.scale.value = 1f;
            lensDistortion.active = false;


            Debug.Log("[FilmLook] Effect reset successfully");
        }


        private void SaveState()
        {
            // Save state to a custom variable
            try
            {
                var vars = Engine.GetService<ICustomVariableManager>();
                bool isEnabled = vignette.active || filmGrain.active || lensDistortion.active;
                vars.SetVariableValue("IsFilmLookEnabled", new(isEnabled));

                Debug.Log($"[FilmLook] State saved: IsFilmLookEnabled = {isEnabled}");
            }
            catch (Exception ex)
            {
                Debug.LogWarning($"[FilmLook] Failed to set custom variables: {ex.Message}");
            }
        }
    }
}
◆Explanation
・Custom command linkage: defining the command name
namespace CustomCommands
{
    [CommandAlias("filmLook")]
    public class FilmLook : Command
    {
・Command parameter alias: stop the effect when stop:true is provided
[ParameterAlias("stop")]
 public BooleanParameter StopEffect;

~~~

 // Stop
 if (StopEffect)
 {
    ResetEffect();
    SaveState();
    return;
 }
When the command is called with stop:true, the effect is reset and the state is saved.
・Getting the DefaultVolumeProfile components
 private Vignette vignette;
 private FilmGrain filmGrain;
 private LensDistortion lensDistortion;

~~~

// Get each component from the VolumeStack
 var volumeStack = VolumeManager.instance.stack;
 vignette = volumeStack.GetComponent<Vignette>();
 filmGrain = volumeStack.GetComponent<FilmGrain>();
 lensDistortion = volumeStack.GetComponent<LensDistortion>();
・Applying the effect using the target values we decided on
private void ApplyEffect()
{
    // Vignette settings
    vignette.active = true;
    vignette.intensity.value = 0.5f;
    vignette.smoothness.value = 0.4f;
    vignette.rounded.value = false;


    // Film Grain settings
    filmGrain.active = true;
    filmGrain.type.value = FilmGrainLookup.Medium4; // Medium4 type
    filmGrain.intensity.value = 0.5f;
    filmGrain.response.value = 0.8f;


    // Lens Distortion settings
    lensDistortion.active = true;
    lensDistortion.intensity.value = 0.5f;
    lensDistortion.xMultiplier.value = 1.0f;
    lensDistortion.yMultiplier.value = 1.0f;
    lensDistortion.center.value = new Vector2(0.5f, 0.5f);
    lensDistortion.scale.value = 1.0f;


    Debug.Log("[FilmLook] applied successfully");
}

・Part that’s essential for integration with the system
private void SaveState()
{
    // Save state to a custom variable
    try
    {
        var vars = Engine.GetService<ICustomVariableManager>();
        bool isEnabled = vignette.active || filmGrain.active || lensDistortion.active;
        vars.SetVariableValue("IsFilmLookEnabled", new(isEnabled));

        Debug.Log($"[FilmLook] State saved: IsFilmLookEnabled = {isEnabled}");
    }
    catch (Exception ex)
    {
        Debug.LogWarning($"[FilmLook] Failed to set custom variables: {ex.Message}");
    }
}
Here, we use Naninovel’s custom variable system to save whether the FilmLook effect is currently applied.
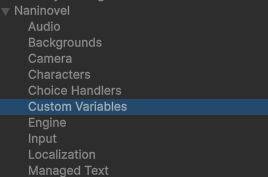
Open Project Settings → Naninovel → Custom Variables and register the variable:
- IsFilmLookEnabled : false
◆Explanation of FilmLookController.cs
Code
using Naninovel;
using System;
using UnityEngine;
using UnityEngine.Rendering;
using UnityEngine.Rendering.Universal;


namespace RenderEffect
{
    /// <summary>
    /// Manages the state of the film-look effect.
    /// </summary>
    [InitializeAtRuntime]
    public class FilmLookController : IEngineService, IStatefulService<GameStateMap>
    {
        [Serializable]
        public class FilmLookState
        {
            public bool IsFilmLookEnabled = false;
        }


        private Vignette vignette;
        private FilmGrain filmGrain;
        private LensDistortion lensDistortion;


        public bool IsFilmLookEnabled =>
            (vignette != null && vignette.active) ||
            (filmGrain != null && filmGrain.active) ||
            (lensDistortion != null && lensDistortion.active);


        // Get references to Volume components
        private void GetVolumeComponents()
        {
            var volumeStack = VolumeManager.instance.stack;
            vignette = volumeStack.GetComponent<Vignette>();
            filmGrain = volumeStack.GetComponent<FilmGrain>();
            lensDistortion = volumeStack.GetComponent<LensDistortion>();


            if (vignette == null || filmGrain == null || lensDistortion == null)
            {
                Debug.LogWarning($"[FilmLookController] Volume components not found");
            }
        }


        // Get the current state
        public FilmLookState GetCurrentState()
        {
            GetVolumeComponents();

            return new FilmLookState
            {
                IsFilmLookEnabled = IsFilmLookEnabled
            };
        }


        // Apply preset
        public void ApplyPreset()
        {
            GetVolumeComponents();

            if (vignette == null || filmGrain == null || lensDistortion == null)
                return;


            // Vignette
            vignette.active = true;
            vignette.intensity.value = 0.5f;
            vignette.smoothness.value = 0.4f;
            vignette.rounded.value = false;


            // Film Grain
            filmGrain.active = true;
            filmGrain.type.value = FilmGrainLookup.Medium4;
            filmGrain.intensity.value = 0.5f;
            filmGrain.response.value = 0.8f;


            // Lens Distortion
            lensDistortion.active = true;
            lensDistortion.intensity.value = 0.5f;
            lensDistortion.xMultiplier.value = 1.0f;
            lensDistortion.yMultiplier.value = 1.0f;
            lensDistortion.center.value = new Vector2(0.5f, 0.5f);
            lensDistortion.scale.value = 1.0f;


            Debug.Log("[FilmLookController] Preset applied");
        }


        // Reset the effect
        public void ResetEffects()
        {
            GetVolumeComponents();

            if (vignette == null || filmGrain == null || lensDistortion == null)
                return;


            vignette.active = false;
            vignette.intensity.value = 0f;
            vignette.smoothness.value = 0.2f;
            vignette.rounded.value = false;
            vignette.center.value = new Vector2(0.5f, 0.5f);


            filmGrain.active = false;
            filmGrain.intensity.value = 0f;
            filmGrain.type.value = FilmGrainLookup.Thin1;
            filmGrain.response.value = 0.8f;


            lensDistortion.active = false;
            lensDistortion.intensity.value = 0f;
            lensDistortion.xMultiplier.value = 1f;
            lensDistortion.yMultiplier.value = 1f;
            lensDistortion.center.value = new Vector2(0.5f, 0.5f);
            lensDistortion.scale.value = 1f;


            Debug.Log("[FilmLookController] Effects reset");
        }


        public UniTask InitializeService()
        {
            GetVolumeComponents();
            ResetEffects();
            Debug.Log("[FilmLookController] Service initialized");
            return UniTask.CompletedTask;
        }


        public void ResetService()
        {
            try
            {
                var vars = Engine.GetService<ICustomVariableManager>();
                var filmLookValue = vars.GetVariableValue("IsFilmLookEnabled");

                if (filmLookValue != null && filmLookValue.Type == CustomVariableValueType.Boolean && !filmLookValue.Boolean)
                {
                    ResetEffects();
                }
            }
            catch (Exception e)
            {
                Debug.LogError($"[FilmLookController] Failed to reset: {e}");
            }
        }


        public void DestroyService()
        {
            ResetEffects();
            Debug.Log("[FilmLookController] Service destroyed");
        }


        public void SaveServiceState(GameStateMap stateMap)
        {
            var state = GetCurrentState();
            stateMap.SetState(state);
            Debug.Log($"[FilmLookController] State saved - IsEnabled:{state.IsFilmLookEnabled}");
        }


        public async UniTask LoadServiceState(GameStateMap stateMap)
        {
            var state = stateMap.GetState<FilmLookState>() ?? new FilmLookState();

            try
            {
                Debug.Log($"[FilmLookController] LoadServiceState started - IsEnabled:{state.IsFilmLookEnabled}");

                // Wait for VolumeStack to initialize
                await WaitForVolumeStackInitialization();

                // Restore state
                if (state.IsFilmLookEnabled)
                {
                    await UniTask.Yield(PlayerLoopTiming.Update);
                    ApplyPreset();
                }
                else
                {
                    ResetEffects();
                }
            }
            catch (Exception e)
            {
                Debug.LogError($"[FilmLookController] Failed to load state: {e}");
            }
        }


        private async UniTask WaitForVolumeStackInitialization()
        {
            int maxRetries = 50;
            int retryCount = 0;

            while (retryCount < maxRetries)
            {
                vignette = null;
                filmGrain = null;
                lensDistortion = null;

                GetVolumeComponents();

                if (vignette != null && filmGrain != null && lensDistortion != null)
                {
                    Debug.Log($"[FilmLookController] VolumeStack initialized after {retryCount} retries");
                    return;
                }

                retryCount++;
                await UniTask.Yield(PlayerLoopTiming.Update);
            }

            Debug.LogWarning($"[FilmLookController] VolumeStack initialization timeout after {maxRetries} retries");
        }
    }
}
This is a part I implemented with a lot of help from AI. It lets us save the FilmLook enabled state into the GameStateMap that Naninovel reads during save/load.
It also uses the engine’s interfaces to ensure the post-processing effect is cleared when the game resets. Let’s go through each piece.
・Interface inheritance
/// <summary>
/// Manages the state of the film-look effect.
/// </summary>
[InitializeAtRuntime]
public class FilmLookController : IEngineService, IStatefulService<GameStateMap>
{
We inherit from Naninovel’s engine service interface and the GameStateMap interface for save data operations.
Let’s look at the methods implemented for each interface.
●IEngineService interface
1. UniTask InitializeService()
Call timing: when the engine starts and the service is first initialized.
public UniTask InitializeService()
{
    GetVolumeComponents(); // Get Volume references
    ResetEffects();        // Reset to default state
    Debug.Log("[FilmLookController] Service initialized");
    return UniTask.CompletedTask;
}
This is called once at game startup.
Here we get references to Vignette, FilmGrain, and LensDistortion from the VolumeStack and reset the effects to their default (OFF) state.
2. void ResetService()
Call timing: when the scene is reset or you return to the title, etc.
public void ResetService()
{
  try
  {
    var vars = Engine.GetService<ICustomVariableManager>();
    var filmLookValue = vars.GetVariableValue("IsFilmLookEnabled");

    if (filmLookValue != null &&
      filmLookValue.Type == CustomVariableValueType.Boolean &&
      !filmLookValue.Boolean)
    {
      ResetEffects();
    }
  }
  catch (Exception e)
  {
    Debug.LogError($"[FilmLookController] Failed to reset: {e}");
  }
}
We check the custom variable IsFilmLookEnabled.
If it’s false, we reset (turn OFF) the effect.
If it’s true, we keep the current state.
3. void DestroyService()
Call timing: when the engine shuts down and the service is destroyed.
public void DestroyService()
{
    ResetEffects(); // Turn the effect OFF
    Debug.Log("[FilmLookController] Service destroyed");
}
This is called when the game exits or when you exit Play mode in the editor. It performs cleanup.
●IStatefulService<GameStateMap>Interface
This interface is for services that support save/load. It manages saving and restoring game state.
1. void SaveServiceState(GameStateMap stateMap)
Call timing: when the player saves.
public void SaveServiceState(GameStateMap stateMap)
{
    var state = GetCurrentState(); // Get current state
    stateMap.SetState(state);      // Save it to GameStateMap
}
GetCurrentState() retrieves the current effect enabled state.
A FilmLookState object (with just the IsFilmLookEnabled flag) is saved.
This records the state in the save data.
2. async UniTask LoadServiceState(GameStateMap stateMap)
Call timing: when the player loads.
public async UniTask LoadServiceState(GameStateMap stateMap)
{
    var state = stateMap.GetState<FilmLookState>() ?? new FilmLookState();

    try
    {
        Debug.Log($"[FilmLookController] LoadServiceState started - IsEnabled:{state.IsFilmLookEnabled}");

        // Wait for VolumeStack to initialize
        await WaitForVolumeStackInitialization();

        // Restore state
        if (state.IsFilmLookEnabled)
        {
            await UniTask.Yield(PlayerLoopTiming.Update);
            ApplyPreset(); // Apply preset
        }
        else
        {
            ResetEffects(); // Turn effect OFF
        }
    }
    catch (Exception e)
    {
        Debug.LogError($"[FilmLookController] Failed to load state: {e}");
    }
}
stateMap.GetState<FilmLookState>() retrieves the state from the save data.
We wait for the VolumeStack to finish initializing.
If IsFilmLookEnabled is true, we apply the preset; if false, we reset.
After loading, the effect is restored according to where you are in the story.
I implemented WaitForVolumeStackInitialization() because I often ran into issues where the VolumeProfile wouldn’t load correctly during load, and I felt a retry mechanism was necessary.
4.Execution
That’s it for the implementation!
Since this is all custom command and engine-side implementation, there’s nothing to set up in the Inspector. The only thing you must not forget is to create the custom variable IsFilmLookEnabled in Config.
In your scenario file, try writing something like this and run it:
@hideAll

@filmLook

@wait 1
@back [someBackgroundName] time:1

@wait 1

@filmLook stop:true
If the effect is applied to the background and then returns to normal after one second, you’re good!
You should also test the save/load behavior.
5.Extensions
In this article we implemented FilmLook, but there are many other effects available in DefaultVolumeProfile.
For example, using Bloom or ChannelMixer could be interesting.
You could also use DOTween to smoothly animate lens distortion.
All of these enhancements should be implementable just by asking AI to improve on the implementation files from this article.
For AI–Naninovel integration, please refer back to this post:
“How to customize the visual novel engine source together with AI”
That’s about it for this development entry.
For the next one, I’m considering a breakdown of how the demo video was implemented.
Thank you for reading all the way to the end.
Please continue to support HazeDenki.
Comments (2)
Leave a comment